If you are a quant, algorithmic trader, or developer who lives in TradingView, you probably have the same problem:
Your trading ideas run in TradingView, but your execution happens somewhere else.
- You backtest and visualize in TradingView.
- You place real orders in your broker or exchange.
- You still click Buy and Sell by hand.
This guide shows you how to connect Autotrade Pro with TradingView using webhooks, so your TradingView alerts trigger fully automated trades — without writing code.
The focus here is clear, non‑technical explanations for:
- Quants and system traders
- Algorithmic traders managing multiple strategies
- Developers who want a clean, reliable automation flow
- Traders who want to remove manual clicks from execution
What Is a Webhook?
Skip the technical jargon and think of a webhook like this:
A webhook is an automatic message TradingView sends to Autotrade Pro the moment your alert fires.
Key points:
- It’s event‑driven: TradingView only sends the message when your condition is true.
- It’s instant: the message is pushed as soon as the alert triggers.
- It’s structured: the message includes specific values (symbol, side, signal type, etc.) that Autotrade Pro understands.
You don’t need to program the webhook yourself. In practice you only:
- Paste a Webhook URL into TradingView.
- Define the alert message in TradingView (a template Autotrade Pro will read).
That’s all the “webhook coding” you ever have to do.
Who Is This Integration For?
Connecting Autotrade Pro and TradingView via webhooks is ideal if you:
- Run systematic strategies (trend, mean reversion, breakout, volatility filters).
- Trade multiple assets or multiple accounts and want consistent, rule‑based execution.
- Prefer to design logic visually in TradingView, but still want real, hands‑off automation.
- Are a developer or quant who wants a clean, testable automation pipeline without building your own broker integration.
Typical use cases:
- Turn Pine indicators into live orders automatically.
- Mirror TradingView signals into multiple accounts.
- Automate entries and exits.
Prerequisites
Before wiring anything together, make sure you have:
1. TradingView
- An account with alerts enabled (free plans have limits; paid plans give you more alerts and lower timeframes).
- Your indicator or strategy configured on the chart:
- Timeframe selected
- Settings tuned
- Signals visually working as expected
2. Webhook provider
- Setup your webhook provider. We are using Webhook.Site during development.
- Obtain your webhook provider host, API key and token before proceed.
3. Autotrade Pro
- An active Autotrade Pro account.
4. Environment for Testing
- A paper trading or sandbox environment, or at least the ability to trade with very small size.
- Enough time to run several live tests before putting real size behind the strategy.
Big Picture: How TradingView and Autotrade Pro Talk
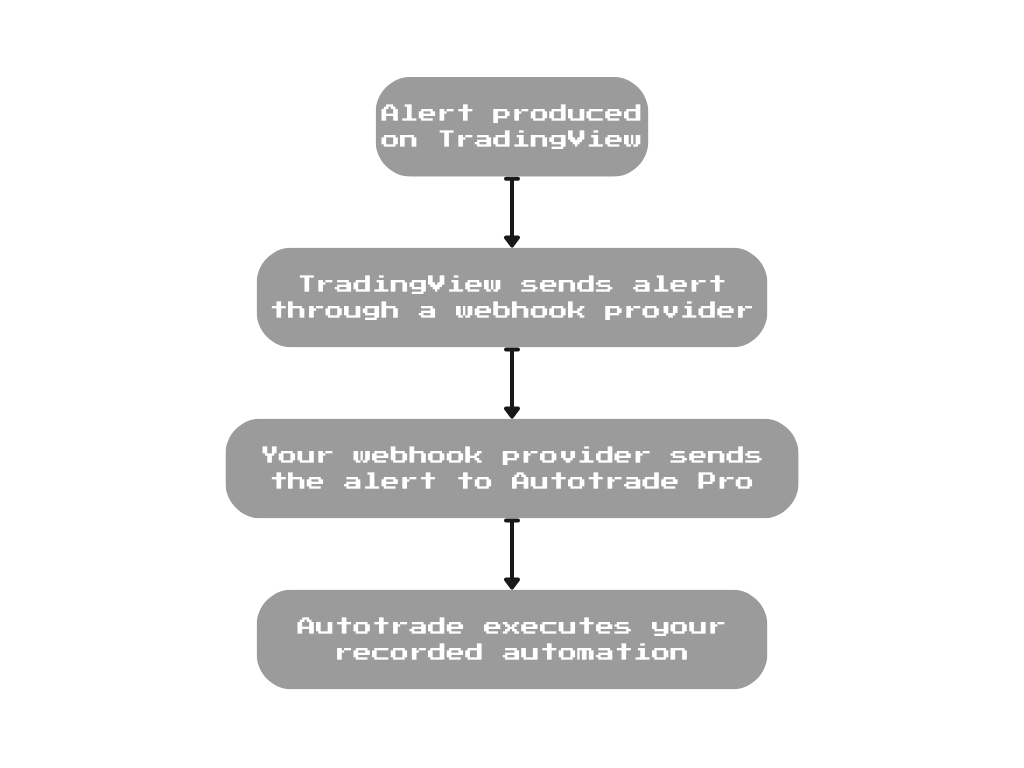
Let’s zoom out and describe the end‑to‑end flow.
- Signal on TradingView: Your alert condition is met (for example: “Close crosses above 200 EMA on BTCUSDT, 1‑hour chart”).
- TradingView Sends a Webhook: TradingView automatically sends a small data packet (the webhook) to your Webhook URL.
- Autotrade Pro Receives It: Autotrade Pro reads the message and matches it to one of your robots.
- Order Execution at Your Broker/Exchange: Autotrade Pro executes your automation.
Once it’s set up, this pipeline runs automatically!
Step 1 – Get Your Webhook URL from Autotrade Pro
Log in to Autotrade Pro and look for Settings → Webhook. You should find:
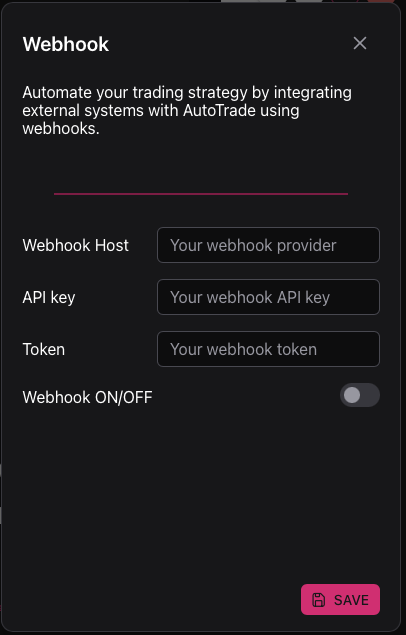
- A Webhook Host — the address where TradingView will send alerts. By default we use Webhook.Site, but you can set your own.
- API key and/or token that must be included in the alert message body.
- A toggle to switch on the webhook module.
- A prompt to reload the app after enabling.
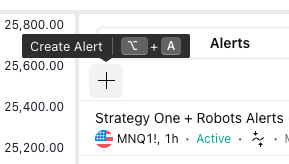
Step 2 – Create a Webhook Alert in TradingView
Now move to TradingView:
- Open the chart for the asset and timeframe you want to automate.Make sure your indicator or strategy is added and visually working.
- Click the Alert button (clock icon with a “+”) or right‑click on the chart and choose “Add alert…”.
Set up the alert:
- Condition: Choose the indicator/strategy and the signal (e.g., “Strategy: Long Entry”, “Strategy: Short Exit”, “Crossing Up”, etc).
- Options: For most systematic strategies, “Once per bar close” is safer than “Once per bar” because it avoids mid‑bar noise and repeated triggers.
- Webhook: Enable “Webhook URL.” Then paste the Webhook URL from Autotrade Pro. In the example, we are using webhook.site, but you can use any webhook provider.
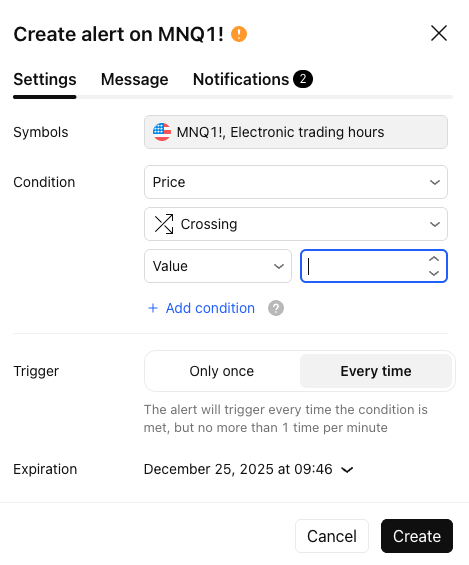
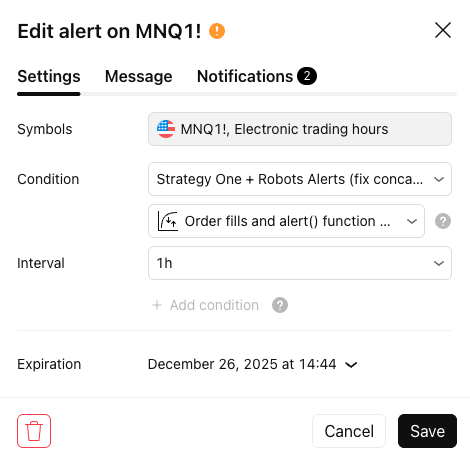
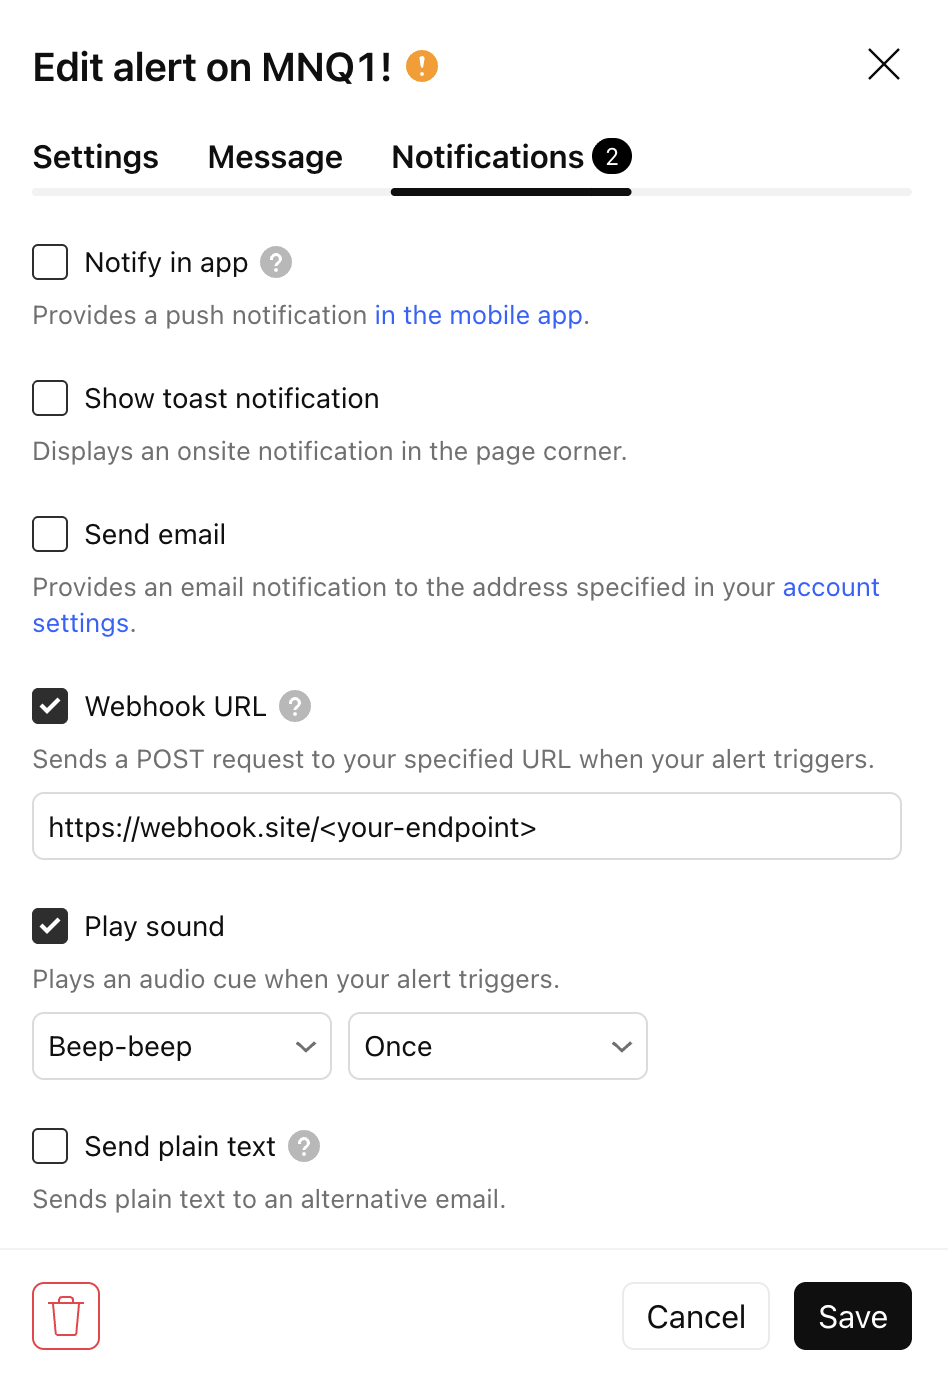
The final — and most important — part is the alert message.
Step 3 – Design the Alert Message for Autotrade Pro
TradingView has strict rules for outgoing messages. You usually want a simple payload with your robot name, as in this Pine Script example:
buildPayload(name) =>
    '{"action":"run_robot", "kwargs":{"name":"' + name + '"}}'

sendRobot(nameSuffix) =>
    robotName = prefix + "-" + nameSuffix
    payload = buildPayload(robotName)
    alert(payload, alert.freq_once_per_bar_close)

if long_condition
    strategy.entry("BUY", strategy.long)
    sendRobot("BUY")

if short_condition
    strategy.entry("SELL", strategy.short)
    sendRobot("SELL")
In this example, “BUY” and “SELL” are the robot names in your local instance. The "action":"run_robot" flag tells Autotrade Pro to run the robot whose "name" is “SELL” or “BUY.” Replace those strings with your actual robot names.
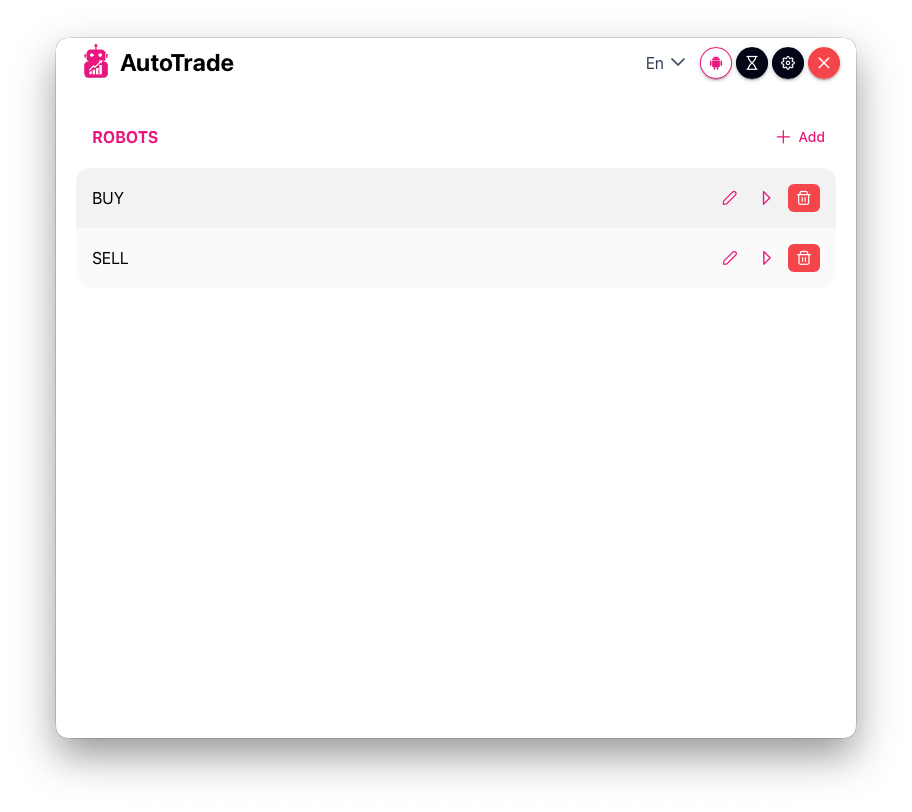
Step 4 – Map Webhook Messages to Execution in Autotrade Pro
Go back to Autotrade Pro and create the execution logic that says, in plain language: “When I receive a webhook for robot = ‘BUY’, execute a long position on BTCUSDT.”
Create or edit the robot, then record the buy action for execution. Remember, the robot stores the x/y coordinates of your mouse. Keep the main window in exactly the same position to ensure the playback works as recorded.
We strongly recommend separating entry and exit signals (and robots). For systematic trading and algo portfolios, clean entry/exit separation is crucial.
- Option A – Two Separate Alerts. Create separate TradingView alerts for entries and exits, then automate each with Autotrade Pro.
- Option B – Single Alert with Dynamic Action. If your TradingView script supports it, send dynamic values using placeholders.
Whatever you choose, keep your logic explicit and easy to audit later.
Step 5 – Test the Integration Safely
Never go straight to full size on a new automation. Test first.
- Use Paper Trading or Tiny Size. Use demo accounts or paper trading setups when available. If not, trade minimum size that keeps risk negligible.
- Fire a Controlled Test Alert. Create a very simple alert (e.g., price crossing a close level). Move the level so the alert triggers quickly. Check that TradingView shows the alert trigger in the alerts log.
- Check Autotrade Pro Logs Verify that Autotrade Pro received the webhook and executes the robot successfully.
Test behavior when:
- A new entry signal arrives while a position already exists.
- Multiple alerts fire on the same bar or in quick succession.
- Only after several clean test runs should you increase size or deploy the strategy to production capital.
Common Pitfalls and How to Avoid Them
Here are frequent issues when connecting Autotrade Pro and TradingView, plus fixes:
- Duplicate or noisy alerts
- Problem: multiple triggers in the same bar or flickering conditions.
- Fix:
- Prefer “Once per bar close” instead of “Once per bar.”
- Add simple filters to your strategy logic to avoid micro‑signals.
- Silent failures
- Problem: you assume orders are being sent, but the webhook format is wrong.
- Fix:
- Check Autotrade Pro logs whenever you add or change a strategy.
- Fire a test alert after any important change to your alert message.
FAQ: Autotrade Pro + TradingView Webhooks
Do I need to know how to code to use webhooks? No. You don’t need to write code. You just:
- Configure your Webhook URL.
- Paste a template into the alert message, following Autotrade Pro’s examples.
- That’s all the “coding” involved.
Can I use multiple strategies and accounts? Yes. This is where the setup shines for quants and multi‑strategy traders.
Is the webhook connection secure? Webhook URLs are typically long, unique, and use HTTPS. Many platforms also require a token or secret in the message. Don’t share your > URL or token publicly, and rotate them if needed.
What happens if my internet goes down? AutoTrade is a local instance. You have all the control. If no internet, no webhook connection available and no alert/execution received.
How do I stop the automation quickly? You can:
- Disable or delete the TradingView alerts.
- Disable the strategy rules inside Autotrade Pro.
- Disconnect the broker/exchange from Autotrade Pro if needed.
For production setups, decide in advance which emergency action you want to use.
Summary: From Charts to Automated Execution
By connecting Autotrade Pro and TradingView with webhooks, you turn your TradingView strategies into a fully automated trading pipeline:
- Design and validate signals visually in TradingView.
- Use a Webhook URL and a alerts to describe each signal.
- Let Autotrade Pro handle order execution.
- Test with paper or tiny size, then gradually scale.
If you’re a quant, algo trader, or developer, this setup gives you:
- A clean separation of signal logic and execution logic.
- A scalable way to manage multiple strategies and accounts.
- A path from idea to production‑ready trading automation without building a full broker integration yourself.
Once it’s live and tested, your strategies run end‑to‑end: TradingView generates the signal, Autotrade Pro executes the trade, and you focus on research, risk, and portfolio design — not clicking buttons.